|
ROOM EXPANSION
Take full control of a room. DAMN!
- SMILE - HxD - Lunar Address What you'll be doing/learning by following this guide (hopefully) - Identifying rooms by their ID and the amount of level data that they have - Expanding your ROM to use new banks of free space - Using a hex editor to analyze bank offsets (no hex actual editing will be done) - Converting bank offsets to level data pointers with Lunar Address - Changing level data pointers and effectively controlling any room's data allowance If you're not familiar with hex, use HxD so this walkthrough is easier to... walk through. I use SMILE 2.0, so I can't guarantee the steps will be exactly the same if you have a different version, but it shouldn't be hard to figure out. If your Super Metroid ROM has a header, REMOVE IT (in SMILE: click "Tools" > "Header" > "Remove Header"), otherwise the values in this guide will be off. Taking away the header will not damage your ROM. What is room data and what is the advantage of expanding? Room data, or tile data is the allotted space each room has. It varies depending on the size of the room, and for a lot of people there's plenty of space to work with by default. For others who put a lot of detail into level design, size limits can become a problem. Expanding and learning to choose how much space a room has allows for a lot more creative control. 
Note the room ID, and the room sizes reference. The room pictured above would be "793AA - 462" What if we want to make the room bigger or just give it a lot of pretty detail? 462 isn't much space to work with at all. TIME TO FIX THAT. To make it easier, we're going to set aside a whole bank for room data. If you don't know about banks, don't worry, you can still make it through this. All you need to know right now is that SMILE is capable adding new banks to the ROM. These banks are free space for you to do whatever you want with. Okay, great. Here's a run-down of the process. 1. In SMILE, open the room ID you want more data for. I'm gonna use 793AA in this example. You should too if this is your first time ever touching hex. 2. Click "File" > "Save Room" - this causes the [## / ##] to display like in the picture above. 3. Click "Tools" > "Expand ROM" > "Yes" 4. Pay attention to what bank SMILE tells you that it just added. If it's your first time expanding, it will be '$E0' and from there it continues to $E1, $E2, $E3, etc., all the way up to $FF. That's 32 banks total. To give some perspective, 1 bank = about 32000 room data. 32 banks = about 1024000 room data. 5. In this case, we'll be using bank $E0 for our room data. Open HxD and load your ROM in it. 6. Click "Search" > "GOTO" > type in the offset "300000" (make sure the "hex" and "begin" buttons are checked) > "OK" 
Observe that "00300000" is the beginning of bank $E0. To save some time and energy, I threw together a quick reference with the offsets for banks $E0-$FF and the level data pointer for each. You're welcome. 7. Open "level_entries.txt" in smile\files and scroll to the very bottom. 8. Add the values "300000" and "308000" to the very bottom of level_entries.txt so it looks like this: 2FD581 2FE000 2FF000 $E0 BEGIN--300000 $E0 END----308000 9. Open Lunar Address and enter "300000" into the "PC File Address" box. Make sure the "LoROM - PC 80:8000 - FF:FFFF" circle is checked. The "SNES LoROM" box should then tell you "$E0:8000" (your new level data pointer) like in the image below. Uncheck the "Format Results" box if you want it display as "E08000" instead. 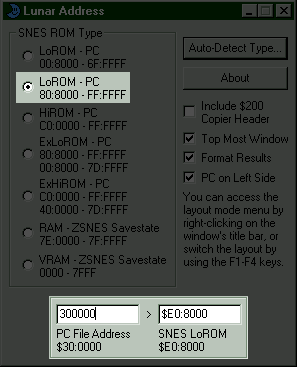
I know this doesn't seem related to expanding rooms, but I promise there is a point to all of this. Just wait. 10. Open SMILE back up and save the changes you made to level_entries.txt now. Click "Edit" > "Pointers" and replace whatever is already in the 'Level Data' field with E08000 like so: 
Easy enough. 11. Next, click "Save Pointers" > Save and Re-Open? "OK" > What do we have here? 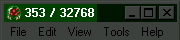
Can I get a hell yeah? 12. If you did every step right, your tile data allowance should jump to a delicious 32000. That's wonderful and all, but keep in mind that your room is now pointing to all of bank $E0's data at once. The two values, 300000-308000 that you entered in level_entries.txt were the start-end points of bank $E0. Unless you plan on making it an insanely huge room by adding doors and/or repointing scroll data, it's unlikely you'll ever go over 10,000 for a single one. By making more conversions with Lunar Address and learning to recognize the level data in hex, you can easily distribute bank $E0 throughout many rooms. Take a look at this: 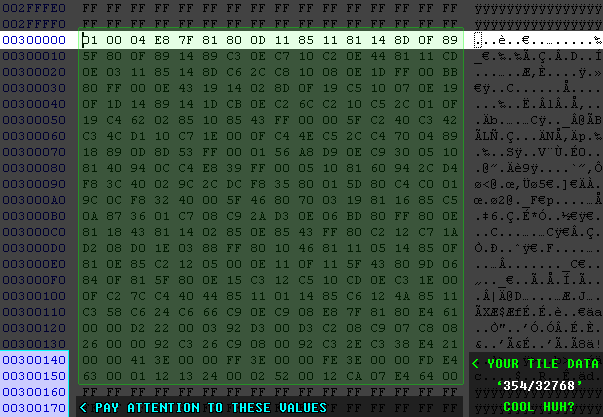
Observe the "00300000" again - but something's different... Let's take a closer look at some things about the screenshot above. See all of those garbled letters and numbers inside the green square? If you'll remember in this image, there was originally nothing but a bunch of FF FFs surrounding 00300000. If the picture didn't make it obvious enough, the added randomness is the 353 bytes that room 793AA is currently using, which you directed right to offset 300000 by entering E08000 in SMILE's pointer window and saving. Oh, cool, everything is tying together now. I hope? If it helps any, count the rows/lines inside the green square and multiply both numbers(16 rows long, 22 lines tall; 16x22 = 352). Now, about those values I told you to pay attention to. The numbers themselves aren't important. I'm pointing them out to emphasize what lines are. "Is he seriously telling us what LINES are?" Yes I am. I know this is a given for most who will read this, but I'm trying to be as noob-friendly as possible here. Line 2: 00300150 Line 3: 00300160 Line 4: 00300170 4 lines tall. Got it? Good. So when I tell you to "skip 10 lines" you should know exactly what I'm talking about now. Let's continue. 13. Build your room in SMILE. Make it awesome. Once you're happy with what you have, save the room and write down the amount of tile data being used. After slathering random graphics all over layers 1 and 2 for the sake of example, I wound up with [1686 / 32768]. Naturally, data usage will vary widely from person to person and room to room. 14. Back to HxD. "Search" > "GOTO" > Offset "300000" > Oh, wow. The random characters have multipled ever so swiftly! 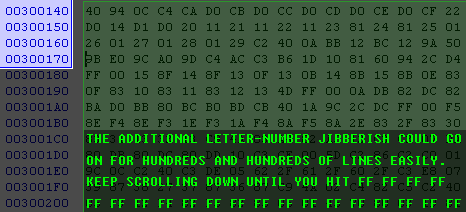
Yes, hundreds of lines. 15. Do as the picture commands and scroll down. Keep scrolling. Keeeeep scrolling. Or hit the Page Down key. Whatever works. Stop right where the data goes from being letters and numbers to FF FF only (shown in the red below): 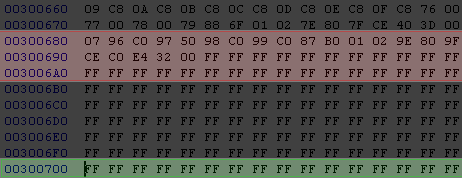
Notice the 5 lines between red and green The highlighted red lines are where room 793AA's level data ends. The highlighted green line is where the next repointed room's level data will start going. I only left 5 lines of free space between the red and green because I won't be making any more changes to 793AA. You'll probably want to skip more than 5. 20 works. My room 793AA is taking up 1686 / 32768 tile data right now. That 1686 is approximately 106 lines in the hex editor. If you wanted 793AA to be left with somewhere around 1686 / 2000 after repointing again, you would skip about 20 lines between the red and green. 16. Back to that highlighted green line. See the offset for it? "00300700" Bring up Lunar Address again. In the "PC File Address" box, type in 300700. The result that appears in the "SNES LoROM" box should be $E0:8700. There you have it. You're set up to expand another room. All you have to do now is replace another level data pointer with E08700. Let's go do that right now, just to refresh our memory. 17. Open room ID 79A44 18. It's time to add another level_entries.txt entry. Can you guess what we're putting in this time?! Since the offsets 300000-308000 are the beginning-end points for bank $E0, we will be putting our new level data pointers between them. The end of your level_entries.txt file should now look like this: 2FE000 2FF000 $E0 BEGIN--300000 300700 $E0 END----308000 19. Save level_entries.txt and return to SMILE. Click "Edit" > "Pointers" and replace the 'Level Data' value (C4811E) with our new value, E08700. Click "Save Pointers" > Save and Re-Open? "OK" 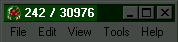
Sweet. How 'bout that? It isn't 32000 this time. That tells us that the bank's space is being distributed properly. Now take a quick glance back in HxD at our 300700 offset. Just like offset 300000, the FF FF that surrounded it has been replaced by miscellaneous hex bytes: 
Yes. Hundreds of lines again. Possibly. 20. Seeing the pattern yet? Now we're back to the "Build a room and make it awesome" phase. After you build an awesome room and are ready to repoint again, go to offset 307000. Scroll down until the ## ##s turns into FF FFs, skip however many lines you want, look at the blue 00###### offset for the line you choose, punch it into Lunar Address, grab your pointer from the "SNES LoROM" box and enter that as any room's new 'Level Data' pointer. Lather, rinse, repeat. Get all of that down, and room size will never be an issue again. PART 2: ROOM SIZE/MOVING DOORS
If you made it through part 1, then part 2 should be very easy because everything will be done within SMILE this time. Suggested tools - SMILE What you'll be doing/learning by following this guide (hopefully) - Recognizing the width/height of a room - Modifying the width/height to change its size - Moving doors to a new location after the room's size has been altered - Editing the game's map to reflect a room's new size Like part 1, this knowledge can be applied to just about any room in the game. I'll do my best to explain and illustrate this in a way that teaches you how. If you'll remember, at the end of part 1, we changed the level data pointer of room ID 79A44 and left it with 30976 tile data. For the sake of continuity, I'm going to use that one for this tutorial. 1. In SMILE, open room 79A44 and make sure that you've expanded it! By default, room 79A44 starts out with 242 / 276 tile data. This will NOT be enough space for what we're doing. If you followed part 1 of this tutorial, you should be good to go because you changed this room's level data pointer and bumped it up to around 30000 space already. 
The above picture is how this room should look in SMILE for you right now. If you don't see the 2 blue squares, click "View" > "Options" > "Show Scroll Areas" and they will appear. Understanding these squares and how their number determines a room's size is very important if you're serious about editing Super Metroid in detail. Currently, room 79A44 is 2x1. This means that it is 2 squares long (width), and 1 square tall (height). The smallest a room can be is 1x1, and the largest it can be is anything that totals 50 squares in size. 2. Click "Edit" > "Room Properties" and look at the Width/Height fields. What do you know? 2 width, 1 height. Changing these numbers will change the size of the room, so let's do that. 3. Replace "Height: 1" with "Height: 3" (DON'T change the width yet! I'll explain why later). This will of course make your room go from being 2x1 to 2x3. Click "OK" - For this change to happen, SMILE must save and re-open this room! - click "OK" again. "What's with all the yellow door chunks!?" This is normal. Right-click anywhere in the room where there's normal air and "erase" all of the yellow door pieces if you want to get rid of them right now. There you have it. Your room is now 3x larger than it was. That's the gist of increasing room size, but there's more to learn before this knowledge can be used to its full extent This will be different depending on the room, but in the case 79A44, you probably noticed that a red square appeared, and that where 3 other squares should have been, there are none. 
Click here to see what the above square diagram would look like in SMILE 4. Click "Tools" > "Scroll Editor (refreshes room)" to get a smaller view of the room. Click on the red square and change it to either blue or green. You'll notice that the color of the square that your mouse cursor is inside will alternate between red, green, and blue every time you click. Clicking where there aren't any squares visible will "create" a square in that area. If you don't know the difference between the red/green/blue squares, that's fine. Just use blue or green ones for right now. Also, the squares that aren't visible will behave as green squares by default, which are almost exactly the same as blue squares. If you leave those alone and don't "create" a square where they are, everything should still work fine. Basically, stick with only blue/green/invisible squares unless you know how to handle red ones. That's almost all you need to know about extending the height of a room. But what about the width? Why did I tell you not to change it earlier? Well, there's one very good reason: IT'LL DESTROY EVERYTHING ... kinda. Unlike adding height, which simply stuck a bunch of yellow door pieces at the bottom of your room, changing width will completely wreck the room's design, including doors. This means you will have to remake it all if you decide to increase the width of a finished room. There is a way to restore everything you've made, but it's a bit tedious (see section E). I haven't edited 79A44 yet, so obliterating the design's not a big deal since I'm remaking the room anyway. 5. Click "Tools" > "Scroll Editor (refreshes room)" again to return the room to its normal view. Before we give it more width, let's at least preserve our doors so we don't have to redo those. Right-click and hold it. While keeping the right-click button held down, move your cursor up/left. This makes the white box that you "draw" rooms with grow in size. Do this around a whole door so that it appears in SMILE's "ClipBoard" when you release the right-click button, like so: 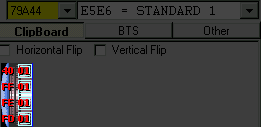
You can also select huge parts of the room itself like this, not just doors 6. Now that you've got a door copied, click once next to the other door so they're beside each other. After you do that, put both doors on SMILE's "ClipBoard" so you end up with this: 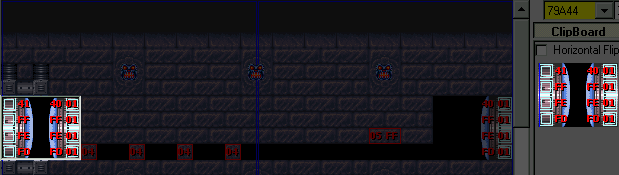
If your room has more than 2 doors, put all of them together in a small cluster like this Nice. Now that we've got our doors copied, it's time to break this room! Don't right-click anywhere until after you add width, or you'll remove the doors from SMILE's clipboard and have to re-select them. 7. Click "Edit" > "Room Properties" again. Yep, we're still at width 2, height 3. Replace "Width: 2" with "Width: 4" this time and click "OK" - For this change to happen, SMILE must save and re-open this room! - click "OK" again. See? Told you everything would get screwed up. Now, click anywhere in the room and the 2 doors you copied will be placed. Here's an updated version of that little doodle from earlier. The brighter squares on the right half are ones we just added; ignore the dim ones on the left half. 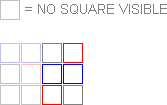
Click here to see how the above diagram looks in SMILE's scroll editor Assuming you didn't change any of the square colors in the scroll editor or erase the yellow door pieces, this is about how the room would look now. 8. Click "Tools" > "Scroll Editor (refreshes room)" yet again and turn the red squares into blue or green. To be on the safe side, leave the non-visible (gray) squares alone this time. Why is it safer doing this? See section E. 9. Remember how you selected the doors by right-clicking, holding the button and moving the mouse up/left? Do it again, but with a patch of regular air. 10. Erase EVERYTHING except the 2 doors. The whole room should now be completely black. 11. Place the doors on opposite ends of the room in the top row of scroll blocks. Make sure the doors are centered properly! The images below should illustrate the centering easily enough. 12. Create a bridge of "solid block" tiles connecting the two doors. Your top row of scroll blocks should be looking something like this: 
As seen in SMILE's scroll editor See what I mean by doors being centered properly inside of the blue squares? That little white square that always follows your mouse cursor around in SMILE is the size of 1 tile in the game. The red/green/blue scroll blocks are 16 tiles tall and 16 tiles wide. When in doubt, start at one corner and count 6 tiles towards the middle of the scroll block. Tiles 7, 8, 9 and 10 will be where your door goes (see image below; the "7 8 8 7" would be the same as counting "7, 8, 9, 10"). 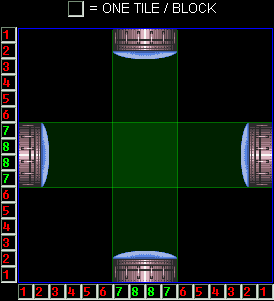
I don't think it's possible to convey it any clearer than this Doors don't absolutely have to be centered, but it's how the game does it normally. Stick with doing it this way until you're more comfortable with editing doors and know more about how rooms connect to each other. Movin' on. 13. Let's test this room and see how everything works so far. If you use SMILE version 2.0 or higher, press the "E" key and select a standard emulator. The game will load room 79A44, and Samus will start wherever your mouse cursor was when you pressed "E." Uh oh. Are you seeing the same problem I am!? 
Holy not good, Batman! If you don't know what's going on in the picture above, pay very close attention, because it's important to be able to recognize exactly what causes doors to glitch up like this. In fact, a picture by itself doesn't do much justice. Here, watch a video of this exact error in action. Can you tell what's happening now? Room 79A44 is indeed much larger than it used to be, but the door on the right side of the room insists on placing us exactly where the door used to be before we moved it. The door on the left side of the room doesn't do this because we didn't change its actual location. The door on the right, however, was moved 2 scroll areas to the right. Here's a quick visual: 
The yellow rectangle is where the door originally was, and where Samus still appears (see video) So, how do we make Samus enter the room from where the door is now, and not from where it used to be? A wonderful process called "door cloning." Don't confuse that with actually adding more doors to a room (that's another tutorial for another day). Essentially, door cloning just means you're moving an existing door to another part of the room. 14. Look at the door itself. Notice the 4 tiles have the 01 over them? Put your mouse cursor over 1 of them and press the "C" key. A box will pop up, in which SMILE tells you to give the door a name. The name you give it doesn't matter, so we'll call it "door1" and click the "OK" button. Save the room, because we're going to another one in this next step. 15. With your mouse cursor still sitting on a 01 door tile, press the "E" key. Doing this 'enters' the door and will take you into the room that it leads to. In this case, it is room ID 792FD. Press the "C" key while your mouse is on any of the 06 tiles (the door leading back to room ID 79A44). Name it "door2" and click "OK" like we just did. Now press "E" while on a 06 tile to get back into room 79A44. 16. Set your mouse on a 01 again, but instead of E or C, press the "D" key to bring up SMILE's door editor window. Oh, lookie. There's the door1 and door2 that we just named. 17. Click on "door2" so it's highlighted. Click the "^---Transfer Properties---^" button. Click the "Remember --->" button. Close the door editor window. Save the room. Go back to room 792FD 18. Set your mouse on a 06 and press the "D" key. Click on "door1" so it's highlighted. Click the "^---Transfer Properties---^" button. Click the "Remember --->" button. Close the door editor window. Save the room. Go back to room 79A44. That's it, congratulations. Door 01 should no longer spit Samus out halfway into the room. Memorize the door cloning process well, because you'll be doing it many, many times in the future if you're serious about revamping Super Metroid. Between repointing level data, adding width/height and moving doors, there's enormous potential for creative hacking if you're determined enough and are willing to devote a lot of time to it. But there's another loose end I wanna take care of... You might have noticed that the map is still the same. Our room 79A44 is 4x3, but the map continues to display the original 2x1. This means that some parts will overlap or show up completely blank. 19. Click "Tools" > "Map Editor" and look at the white box. That's our room at its new size. It covers several other rooms on the map now and looks like a real mess. When you breach the territory of changing room sizes and moving doors around, your map is going to fall into disarray pretty quickly. The only way to prevent this altogether is if you plan your maps out ahead of time and build your rooms to that design. Here's a look at the map editor (zoomed in x4): 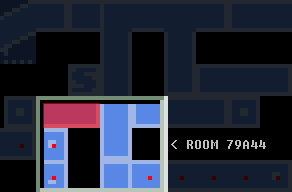
The red area is how big 79A44 used to be 20. To be honest, there's no way for me to tell you exactly how to edit the map - why? Because the map editor itself is just that easy to use, and because the map design you choose would be different from mine anyway. The only thing I should point out is the "Move Room's X/Y With On Next Click (or hold 'M')" button. The white square surrounding the room is the room (see map image above), and it is what will be moved around if you use the button or hold the "M" key. You'll need to do this if you plan on moving a room someplace else, and probably some door cloning afterward. All the blue map tiles are for is showing the player where Samus is able to explore. Just play around with it. Experimenting with the map editor is safe, and it shouldn't break anything - but make a back-up copy of your ROM before starting anyway. There you have it, part 2 of 2 is finique. If I did a good enough job at all of this, you should now be able to repoint level data, expand height/width and move doors around in any room. In closing... At the very end of step 4, I mentioned a way to restore a room's design after expanding the width and wrecking it. Here's a very cut and dry step-by-step. Make a back-up copy of your ROM before you do this! 1. Expand the width to whatever you want it to be and save the room 2. Click "File" > "Open new ROM" and load the back-up copy you just made 3. Load a different room from the one you're in now, then go right back to the room you expanded 4. Right-click and hold it, then select a huge chunk of the room so it's on SMILE's clipboard 5. Click "File" > "Open new ROM" again and load the expanded ROM 6. Go to another room, then back to the expanded room again 7. Place the huge tile chunk we copied to SMILE's clipboard wherever you need it to be 8. Save the room 9. Repeat steps 2-8 until you're satisfied with how much of the room you've restored. This process is kind of monotonous, but it certainly beats rebuilding a whole room all over again. Be very careful with how much you increase a room's width or height! This has to do with why I told you to leave non-visible scroll areas alone in step 8. There is some game-destroying risk involved in making your rooms too large. You see, the red/green/blue scroll areas have their own place in the ROM. The non-visible areas write new scroll data to the ROM when you create the red/green/blue square around it. Add too many, and those new hex bytes may replace some other important values. What happens if you do this? Nearby rooms or potentially other areas of the game will shit all over themselves and die miserably. Nobody wants that. I haven't researched what exactly happens myself. This is why you will need to test your expanded room and all of the other rooms nearby to make sure everything works as it should. Test often and extensively for peace of mind. |