|
ROOM SCROLLS
Repointing, understanding, using.
Section A: Repointing scroll data to free space Section B: Scroll behavior and counting screens Section C: Using scroll PLMs Section D: Using door scroll pointers Section A: Repointing scroll data to free space
First, it's important to know what a scroll is: Each scroll (or "screen") for a room takes 1 byte. In SMILE, if you click "Tools > Scroll Editor (refreshes room)", you'll see that the room has a grid over it. Each square in this grid = 1 scroll. The squares will either be red, green or blue. If all the scrolls appear to be green or blue, but have a gray border/outline around them, this means that the scroll pointer for this room is either 0000 (all blue) or 0001 (all green). Changing the scroll pointer to free space in bank $8F will give the room its own scroll data. * If only a certain square has no color/grid around it, but other squares around it do have colors, don't click the colorless square in SMILE's scroll editor until you've pointed "Scroll" to free space in bank $8F! Clicking the missing square will change it to red, green or blue, which makes SMILE write one extra 00, 01 or 02 to the ROM. This could overwrite data for other rooms. * If you don't see any grid at all in the scroll editor, this means that you're using an older version of SMILE (2.0 or below). The scroll pointer is either 0000 or 0001. Room 7A5ED's scroll pointer is 0000 by default, so every screen/scroll in it acts blue. I'm going to change the scroll pointer to E9D0 (offset: 7E9D0, LoROM: $8FE9D0). There's a small extra step that might needed for repointing scrolls. This is either because of a quirk with SMILE, or something else to do with the way data is written. Doesn't matter, because it's a very easy fix if you run into this issue. After changing the scroll pointer to E9D0, click Yes when SMILE asks you if you want to "copy data or leave it?" You might still not be able to change the scroll colors in SMILE's scroll editor after doing this, but don't worry. Look at offset 7E9D0 in your hex editor, which is where the scroll data will now write to. You should see something like this: FF = the reason SMILE's scroll editor isn't working yet 00 = scrolls written by SMILE after repointing 007E9C0 | 25 03 97 00 00 00 FF FF FF FF FF FF FF FF FF FF 007E9D0 | FF 00 00 00 00 FF FF FF FF FF FF FF FF FF FF FF 007E9E0 | FF FF FF FF FF FF FF FF FF FF FF FF FF FF FF FF That "FF" at offset 7E9D0 is the reason that SMILE's scroll editor isn't letting you edit the room's scroll colors. Here's an opportunity to learn some specifics on how scroll data is written to the ROM. Replace that "FF 00 00 00 00" with "02 01 00 01 02" and save the ROM with your hex editor. Now open the scroll editor in SMILE again (close and re-open the scroll editor window if you still had it open while editing the hex). Look at that, it's working now! Told you it was an easy fix. Change them to whatever colors you want, and save the room. As for learning the specifics: notice that from left to right, the scroll colors are green, blue, red, blue, green (02, 01, 00, 01, 02). If you click No when SMILE asks you to copy data or leave it, the result is only slightly different. Instead of "FF 00 00 00 00" being at offset 7E9D0, it'll be nothing but FF FF because nothing new was copied/written there. Same solution. Replace the single FF byte at offset 7E9D0 with 00 and save the ROM with your hex editor. SMILE's scroll editor will now show a single blue square at the top-left. Change all of the other squares with whatever colors you want, click "Save Normal Scroll" and then save the room. Remember that 1 screen/scroll = 1 byte; if your room has a width of 7 and a height of 5, it is a 7x5-sized room, or 35 bytes of scroll data total if you give every screen a colored square. Another example: room ID 791F8 is a 9x5 room, so its scroll data uses 45 bytes. Also remember that if the room has different states with different scroll pointers (you shouldn't need to do this too often), each of these room states will use X number of bytes for scroll data, with X being the total number of screens/scrolls you decide to use for the room. That's all you need to know about just repointing scroll data. Now for some slightly more advanced stuff (this is all optional, but still really useful). Section B: Scroll behavior and counting screens
Okay, so you know what scrolls are, and you know about how much data each room would need for them. This is already common knowledge, but since this is becoming something of a definitive scroll guide, here's how each of the three scroll types behave: Red scrolls These prevent the camera from following Samus if she walks into one of them. Specifically, they prevent the camera from "seeing" them at all, and will force the camera's focus back on Samus if part of a red scroll is accidentally shown during gameplay. Keep in mind when designing your rooms that red screens should NEVER been seen... unless you know how to use them properly. These are the most common cause for scrolling errors in a room if they're not understood, but they can also be the most useful. You'll find out why later. Blue scrolls These will usually be what you want to use for screens that Samus can explore freely. Blue scrolls, unlike green scrolls, will not show the very top and bottom 2 tiles of a room. If you have a door in the ceiling, it will usually need to be inside of a blue scroll to work. Green scrolls I only use these for floor doors because they're required for them to work most of the time. Green scrolls behave exactly like blue scrolls, except they DO show the very top and bottom 2 tiles of a room. It's more a matter of personal preference, but I don't like using green scrolls for normal, explorable areas. Unless the floor of your room is always near the very bottom of the screen, green scrolls tend to show more of the foreground, which looks sloppy to me when most of the bottom half of the screen is nothing but solid rock. It's hard to explain the difference between blue and green scrolls precisely, so just play around with them and you'll eventually see what I mean. Next order of business: counting screens in hexadecimal. LEARN THIS. It will be very useful to know later on if you decide to use scroll PLMs or door scroll ASM to make the game change scroll colors around automatically. It will also help you understand exactly how many bytes of scroll data that a room will need. In case you don't already know, here's a quick comparison between decimal and hexadecimal, in which I count from 1 to 20: Decimal 1 2 3 4 5 6 7 8 9 10 11 12 13 14 15 16 17 18 19 20 Hexadecimal 0 1 2 3 4 5 6 7 8 9 A B C D E F 10 11 12 13 Got it? Good. It's basically the same as decimal, but with 6 extra "base" numbers that are a single digit (decimal = base10, hexadecimal = base16). Simple in concept, but it can get a bit confusing when you start adding, subtracting, or multiplying in hexadecimal. 6+5 in decimal = 11 9x5 in decimal = 45 6+5 in hexadecimal = B 9x5 in hexadecimal = 2D Enough about that. In SMILE, click "View > Options > Show Scroll Areas" if you want. This displays the red/green/blue scrolls of a room while in level-editing mode. It's not required for anything, but useful to know. Open room 7B40A in SMILE and view it in the scroll editor if you need to. Its scroll block colors should look like this if you haven't edited the room: ## ## ## ## ## ## ## ## ## ## ## ## ## ## ## ## There are 16 blocks total (0F blocks total if you're counting in hexadecimal), so this room's scroll data takes 16 bytes. If you feel like it, take a look at this room's scroll pointer (B435) in a hex editor by going to offset 7B435 ($8FB435). Since the room has 16 screens, pay attention to the first 16 bytes starting at 7B435: 00 00 00 02 00 00 00 02 00 00 00 02 01 01 01 01 00 = red scroll 01 = blue scroll 02 = green scroll 00 00 00 02 00 00 00 02 00 00 00 02 01 01 01 01 00 00 00 02 00 00 00 02 00 00 00 02 01 01 01 01 As you know, room 7A5ED's size is 4x4 (4 screens long, 4 screens tall). If you changed the size of the room and it still totaled 16 screens, for example, 8x2 (8 long, 2 tall), the result would look like this: 00 00 00 02 00 00 00 02 00 00 00 02 01 01 01 01 Everything make sense now? Cool. For determining the exact # of a certain screen, start counting at the very top-left corner of the room and make your way to the bottom-right corner. Scroll PLMs and door scroll ASM read the screen # in hexadecimal, not decimal. The largest that a room be is anything with a TOTAL of 50 screens (31 in hexadecimal). To further drill this into your heads, here are a few rooms with the screen counts noted: Room 1D: 7A5ED (4x4; 16 screens/bytes) 00 01 02 03 04 05 06 07 08 09 0A 0B 0C 0D 0E 0F Room 1D: 7CFC9 (3x8; 24 screens/bytes) 00 01 02 03 04 05 06 07 08 09 0A 0B 0C 0D 0E 0F 10 11 12 13 14 15 16 17 Room ID: 791F8 (9x5; 45 screens/bytes) - landing site 00 01 02 03 04 05 06 07 08 09 0A 0B 0C 0D 0E 0F 10 11 12 13 14 15 16 17 18 19 1A 1B 1C 1D 1E 1F 20 21 22 23 24 25 26 27 28 29 2A 2B 2C Knowing is most of the battle here. You now know how to repoint scroll data, watch data in a hex editor to make sure that nothing gets overwritten, and how to properly count the screens of any room in hexadecimal and locate specific ones. Examples: Samus' ship is located in screen 28 of room ID 791F8. Morphing Ball is located in screen 14 of room ID 79E9F. Next up is learning how to use scroll PLMs and door scroll ASM. Section C: Using scroll PLMs
Don't let the "ASM" (ASM = assembly) part scare you. I barely understand it myself so far. All you'll be doing with ASM here is specifying certain screens to change the scroll colors for. Super Metroid does this quite a few times throughout the game, and it's a VERY effective way of giving an extra level of depth and professionality to the way a room is designed. Before you jump into trying to do this, I'm going to give an example of how a scroll PLM is used in the original game and break it down for you. Open up room ID 792FD in SMILE and look over at the left side of the room. You'll see this: 
Notice that the door is inside of a red scroll block. This is normally a VERY bad idea, because the camera would go crazy as soon as Samus entered the room from the left, or tried to get to the door from the right. A door scroll pointer to ASM in bank $8F changes the red scroll to blue when Samus comes out of the door from the left, and the scroll PLM points to different ASM in bank $8F that changes the same scroll to blue when the red "S" or the 2 extension arrows are touched by Samus. The 2 red PLM arrows have a "High" and "Low" byte of 80 and 00 - all red arrows do. The purpose of these is to extend the range of the scroll PLM, so Samus doesn't accidentally miss touching the "S" and leave the camera behind because the red scroll didn't get changed to a blue scroll like it should. It might be confusing at first since you can't actually see this blue scroll anywhere with SMILE. That's because this is code that the game runs on an as-needed basis instead of it being part of the room's level data, such as the Enemy, PLM or Scroll pointers. This is also why you can't see anything behind that wall until you bomb those blocks and pass them. The purpose of this is to keep hidden parts of a room from being seen through walls until the player finds this secret and touches a PLM that enables the camera to "access" these new parts of a room. How does this ASM work though? Take a look at the scroll PLM in SMILE's PLM window, like so: 
The "High" and "Low" bytes are actually a pointer to data in bank $8F. From that, we get $8F 93 99, which is really just a LoROM address of $8F9399 if you remove the spaces. Convert this to a PC address with Lunar Address, and you get 79399. Nice. Go to this offset in your hex editor and see what's there: # = scroll PLM data at offset 79399 0079380 | 02 00 00 00 00 02 00 00 00 08 02 80 08 00 80 00 0079390 | 00 02 00 06 02 80 06 00 80 00 01 80 02 01 80 04 00793A0 | 01 80 04 00 80 04 00 08 02 80 03 00 20 01 02 01 00 = screen # to change the scroll color for 01 = scroll color that screen # changes to 80 = end of scroll PLM data You see what's going on here, right? 00 01 80 = change screen #1 (00 in hexadecimal) to blue (01). The 80 is just a stopping point, so always have that at the very end. You're not limited to just changing 1 screen at a time with a scroll PLM, either. You can change as many screens with a single PLM as you want (well, up to 50, but I can't see anybody ever needing to change more than like 20 screens at once, and even that's a stretch). How to apply this knowledge, though? Depends what you want to do with your room, exactly. You can do simpler things like hide a portion of the room, or combine it with door scroll pointer ASM and effectively break a very large room into several smaller ones so you're not using up so many room IDs. If you know ASM, you could even write your own custom code to run when a certain scroll PLM is touched. If you still don't quite get it, just do what I do for these next examples. Open room ID 7A5ED in SMILE. If you did what I've told you to do in this guide up until this point, then room 7A5ED should already have its "Scroll" data repointed to free space. If not, repoint it to some free space in bank $8F real quick before you continue. Next, give room 7A5ED a PLM. Read this guide if you don't know how to do that. Start with 01 PLM, and change it into scroll ("S") PLM. Pick some free space in bank $8F for it. I'll be using 7EAA0, which means I'll now need to use EA A0 as the "High" and "Low" bytes. Change the High/Low bytes accordingly and save the room. After you've done that, change the middle screen to a red, leave all of the others blue, and save the room again. Your screen colors should now look like this: # # # # # I'll be doing with this PLM what the original game did, just to demonstrate how to do these in any room that you want. Since this is a 5x1 room, it's only got 5 screens (00-04), which means that 02 is the red screen. I'll be using a morph ball passage to do this for simplicity, but you could have walk-through passages that behave the same way if you use the extension arrow PLMs. Here's what I've done to the room so far: 
I removed the glowing lanterns and background stuff from the room, but it doesn't matter if you leave them there. Alrighty, now to make this PLM do something. Since we want to make screen 02 change from red (00) to blue (01), type this in and save the ROM with your hex editor: 02 01 80 Test the room and see if it works now. Make sure you start out on screen 00 or 01, because if you start out on screen 02, 03 or 04, you'll get scrolling errors for obvious reasons. See how the camera doesn't go past that blue pillar until Samus rolls underneath it? This is all you need to do if there aren't any doors past the PLM. The red scroll is changed to blue, and will stay that way until Samus leaves the room and enters it again. However, since there is a door here, there's more you've gotta do to make it work completely. Enter the door on the right (which leads into the boss statue room), then go back into 7A5ED and make your way left. The camera will stop following Samus as soon as screen 02 is reached. This is because the room "resets" after Samus leaves it and changes screen 02 back into a red scroll. You could place a second scroll PLM in screen 03 that also changes screen 02 to blue so it works both ways, but using a door scroll pointer is a "neater" way of doing it. In the interest of keeping this guide from becoming insanely long, I'm not gonna explain how to use the boss statue room's door scroll pointer to change screen 02 into blue. You'll learn how to do that and more by following the next section of this guide... Section D: Using door scroll pointers
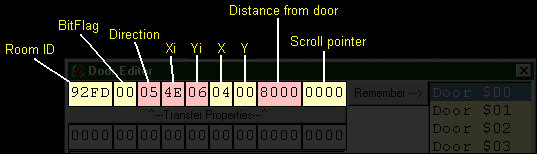
This isn't much different from using scroll PLMs. The main differences are that there's a few extra bytes between each screen #/color change, and the fact that you'll be using doors to change scroll colors when the room loads instead of touching a scroll PLM to do it. You'll also need to do some very basic adding in hexadecimal. Since you already know how to change a single scroll color, I'll be showing you how to do several at once and have two rooms inside of a single room ID. The reason this doesn't work using ## ## 80 like a scroll PLM is because... well, I honestly can't give an in-depth technical explanation why, because I'm still a beginning beginner when it comes to ASM myself. All I can really say is that it has to do with loading the scrolls as the room itself loads, instead of changing them instantly during gameplay. Might as well keep screwing with room 7A5ED since we're still on it. What I'm gonna do is add 2 more doors to the room (read this guide if you don't know how to add doors), then increase the height of the room by 1 so it goes from being a 5x1 room (5 screens) to a 5x2 room (10 screens). Read this guide if you don't know how to change the size of a room. This is what my room looks like now. Make yours look about the same way: 
I moved the scroll pointer I made off-screen since I won't be using it. You should do the same thing for now. You're probably wondering why I put all of those blocks around the floor door in screen 02. I did this to make the transition from a blue scroll to a green scroll unnoticable as you approach the door. Connect the floor/ceiling doors together ala door cloning. Read section C of this guide if you don't know how to clone doors. If you test the room as it is right now, entering the floor door breaks the game's scrolling because of Samus entering a red scroll. Changing the red scroll to green or blue also breaks the scrolling. What to do about this? You guessed it. More pointing to stuff in bank $8F! Before I go into that, consider what all you'll need to do with the room's scroll colors to make it act as 2 separate rooms. The bottom 5 scrolls need to stay red so the camera doesn't reveal that there's another room below Samus until you go through the door. Likewise, after you go through the floor door, the top 5 scrolls will need to become red so the room above isn't shown if Samus jumps. Floor doors usually only work inside of a green scroll, and ceiling doors usually only work inside of a blue scroll. Here's exactly what each of these 2 doors will need to do: Floor door (in screen 02) - Change screens 00, 01, 02, 03 and 04 into red scrolls - Change screens 05, 06, 07, 08 and 09 into blue scrolls Ceiling door (in screen 07) - Change screens 00, 01, 03 and 04 into blue scrolls - Change screen 02 into a green scroll (to keep the floor door working) - Change screens 05, 06, 07, 08 and 09 back into red scrolls There are two ways you can do this. You can enter the bytes manually with your hex editor (which is what I'll be showing you how to do), or you can write it out as an ASM file and compile it. I'll provide the ASM code at the end of this guide for any of you know how to use a compiler and would rather do it that way. As usual, you'll need to pick some free space in bank $8F to use for both doors. I'll start with 7EB00 and use it for the floor door. Go to this offset in your hex editor. Instead of arduously explaining what each byte does (that would require getting into actual assembly structure, of which my knowledge is minimal at best), I'm instead going to give you the full codes to point your doors to and offer enough information on it so you can apply it to any door you want. Trust me, it's not as hard as it might seem by just glancing at it. Floor door in screen 02 ## = scroll color to load ## = screen # to load scroll color to, +20 ------------------------------------------------ 08 E2 20 <- Initiates the ASM below A9 00 <- Loads red scroll to... 8F 20 CD 7E <- screen 00 8F 21 CD 7E <- screen 01 8F 22 CD 7E <- screen 02 8F 23 CD 7E <- screen 03 8F 24 CD 7E <- screen 04 A9 01 <- Loads blue scroll to... 8F 25 CD 7E <- screen 05 8F 26 CD 7E <- screen 06 8F 27 CD 7E <- screen 07 8F 28 CD 7E <- screen 08 8F 29 CD 7E <- screen 09 28 60 <- End of door scroll ASM ------------------------------------------------ Without all the line breaks, commentary and colors, you're left with a nice string of bytes: 08 E2 20 A9 00 8F 20 CD 7E 8F 21 CD 7E 8F 22 CD 7E 8F 23 CD 7E 8F 24 CD 7E A9 01 8F 25 CD 7E 8F 26 CD 7E 8F 27 CD 7E 8F 28 CD 7E 8F 29 CD 7E 28 60 Copy and paste those 49 bytes to offset 7EB00 (or type them if you're badass enough) and save the ROM with your hex editor. In SMILE, change the "scroll pointer" to the floor door in screen 02 to EB00. In the door editor window, the door scroll pointer is the very last 4 bytes (set to 0000 by default for most rooms). Look at this image if you need a reminder for which one is the scroll pointer field. After you change 0000 to EB00, click "Remember" and save the room. Test the room out real quick. Going through the floor door should now put you in the 5-screen "room" below. Check out the whole room and make sure all the scrolls are working as they should. The camera shouldn't move up or down at all while you're on screens 05-09. Next up, the ASM for the ceiling door in screen 07. Ceiling door in screen 07 ## = scroll color to load ## = screen # to load scroll color to, +20 ------------------------------------------------ 08 E2 20 <- Initiates the ASM below A9 00 <- Loads red scroll to... 8F 25 CD 7E <- screen 05 8F 26 CD 7E <- screen 06 8F 27 CD 7E <- screen 07 8F 28 CD 7E <- screen 08 8F 29 CD 7E <- screen 09 A9 01 <- Loads blue scroll to... 8F 20 CD 7E <- screen 00 8F 21 CD 7E <- screen 01 8F 23 CD 7E <- screen 03 8F 24 CD 7E <- screen 04 A9 02 <- Loads green scroll to... 8F 22 CD 7E <- screen 02 28 60 <- End of door scroll ASM ------------------------------------------------ 08 E2 20 A9 00 8F 25 CD 7E 8F 26 CD 7E 8F 27 CD 7E 8F 28 CD 7E 8F 29 CD 7E A9 01 8F 20 CD 7E 8F 21 CD 7E 8F 23 CD 7E 8F 24 CD 7E A9 02 8F 22 CD 7E 28 60 I chose to write the above ASM for the ceiling door to offset 7EB40, so of course your "door scroll" pointer would be EB40. While you're at it, change the "Distance from door" pointer from 8000 to 01C0 - this will keep the floor door from closing around Samus' feet when you emerge from it. You'll need to do this for all ceiling doors in the future, so keep that in mind. Click "Remember" and save the room. Congrats, that's really all you have to do. You can do this with more than just 2 doors in a room. For instance, if you had an enormous room, something like 9x5, you could easily have 3 or 4 smaller rooms within that by changing many scrolls at once. Click here to see a video of what the room should be doing now It's a great little technique for placing a 1x1 item room without needing to use a whole room ID for a single screen. Master this, and you'll be capable of creating very large hacks that compare to or exceed "Super Metroid: Redesign" in size, which itself is 1.5x larger than the original Super Metroid, I believe. To clarify, the bytes that are THIS and THIS color are the only ones you need to edit. If you change the other bytes to anything else without knowing what you're doing, you're pretty much guaranteed to make the game freeze when Samus is transitioning to the next room after entering the door. You can probably guess what the "+20" means. If you're not comfortable enough to do basic hexadecimal addition in your head, Windows Calculator has a hex mode ("Scientific"). All you're doing is adding +20 to screen # you want to change. I won't bother explaining why you have to do this because it involves the game accessing RAM. Just know that if you were going to change screen 0C (13 in decimal) doing this, you would instead enter 2C. For screen 2C (47 in decimal), you would use the value 4C. If you managed to do all of that without running into any problems and learned enough to do it on your own, then double congrats, because you've also soaked up some very basic knowledge on how ASM itself is constructed. Here's what the uncompiled ASM looks like for both of the doors. You don't have to do anything with this. I'm only posting it for educational purposes: ASM for floor door in screen 02 ## = scroll color to load ## = screen # to load scroll color to, +20 ------------------------------------------------ org $8FEB00 ;free space in bank $8F; offset 7EB00 PHP ;Initiates the ASM below SEP #$20 ;Initiates the ASM below LDA #$00 ;load red scroll to... STA $7ECD20 ;screen 00 STA $7ECD21 ;screen 01 STA $7ECD22 ;screen 02 STA $7ECD23 ;screen 03 STA $7ECD24 ;screen 04 LDA #$01 ;load blue scroll to... STA $7ECD25 ;screen 05 STA $7ECD26 ;screen 06 STA $7ECD27 ;screen 07 STA $7ECD28 ;screen 08 STA $7ECD29 ;screen 09 PLP ;End of door scroll ASM RTS ;End of door scroll ASM ------------------------------------------------ ASM for ceiling door in screen 07 ## = scroll color to load ## = screen # to load scroll color to, +20 ------------------------------------------------ org $8FEB40 ;free space in bank $8F; offset 7EB40 PHP ;Initiates the ASM below SEP #$20 ;Initiates the ASM below LDA #$00 ;load red scroll to... STA $7ECD25 ;screen 05 STA $7ECD26 ;screen 06 STA $7ECD27 ;screen 07 STA $7ECD28 ;screen 08 STA $7ECD29 ;screen 09 LDA #$01 ;load blue scroll to... STA $7ECD20 ;screen 00 STA $7ECD21 ;screen 01 STA $7ECD23 ;screen 03 STA $7ECD24 ;screen 04 LDA #$02 ;load green scroll to... STA $7ECD22 ;screen 02 PLP ;End of door scroll ASM RTS ;End of door scroll ASM ------------------------------------------------ I wrote all of this without a shirt on. -Grime |